# Chrome Extension
Use Quor in Chrome from any page
The Quor Chrome Extension allows users to access Quor from anywhere in their browser.
Features include:
- An Quor browser home page
- An Quor sidebar in your browser
- Contextual search on selected text
- Deep Research capabilities
Coming soon: Full page context chat and indexing visited pages into your Quor knowledge base!
 ## Installation Options
**Quor Cloud users**: Install directly from the Chrome Web Store
**Self-hosted users**: Your administrator will provide installation instructions
## Manual Installation (Self-Hosted)
Clone the [Quor Chrome Extension](https://github.com/onyx-dot-app/onyx-chrome-extension) repo from GitHub.
- Visit `chrome://extensions/` in your Chrome browser
- In the upper right corner, click **Developer mode** to enable it
## Installation Options
**Quor Cloud users**: Install directly from the Chrome Web Store
**Self-hosted users**: Your administrator will provide installation instructions
## Manual Installation (Self-Hosted)
Clone the [Quor Chrome Extension](https://github.com/onyx-dot-app/onyx-chrome-extension) repo from GitHub.
- Visit `chrome://extensions/` in your Chrome browser
- In the upper right corner, click **Developer mode** to enable it
 - Click **Load unpacked**
- Select the folder containing the Quor Chrome Extension files
- Click **Load**
The extension is now installed and ready to configure.
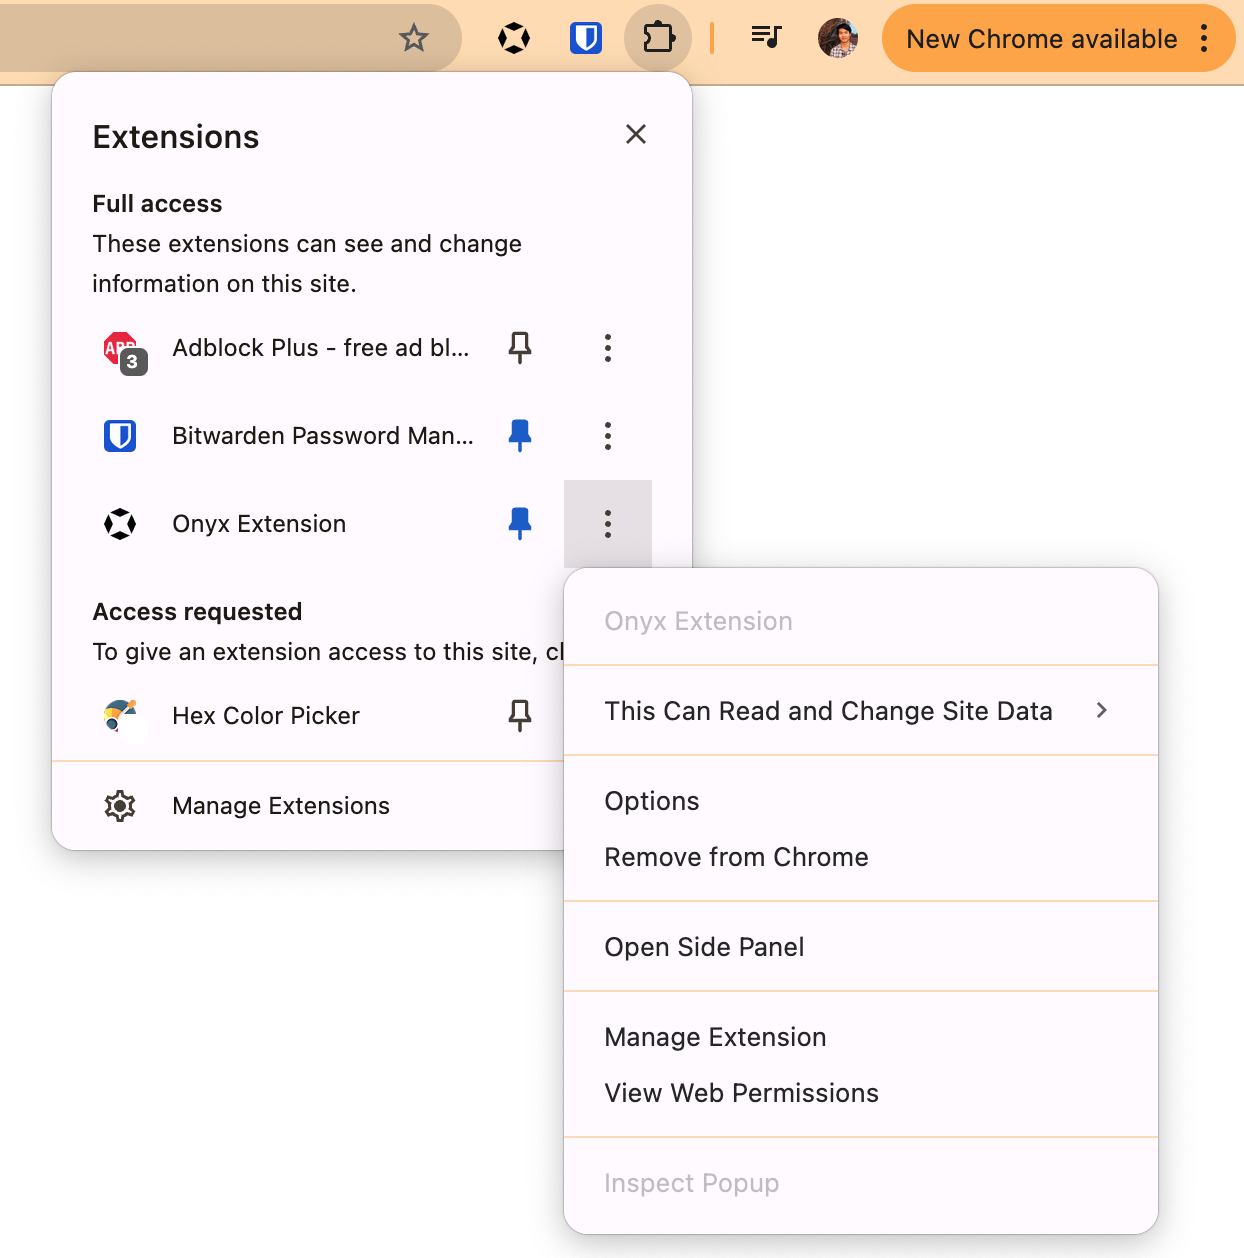
- Click the three dots (...) next to the extension
- Select **Options**
- Set the **Root Domain** to your self-hosted Quor instance's URL
- Click **Load unpacked**
- Select the folder containing the Quor Chrome Extension files
- Click **Load**
The extension is now installed and ready to configure.
- Click the three dots (...) next to the extension
- Select **Options**
- Set the **Root Domain** to your self-hosted Quor instance's URL
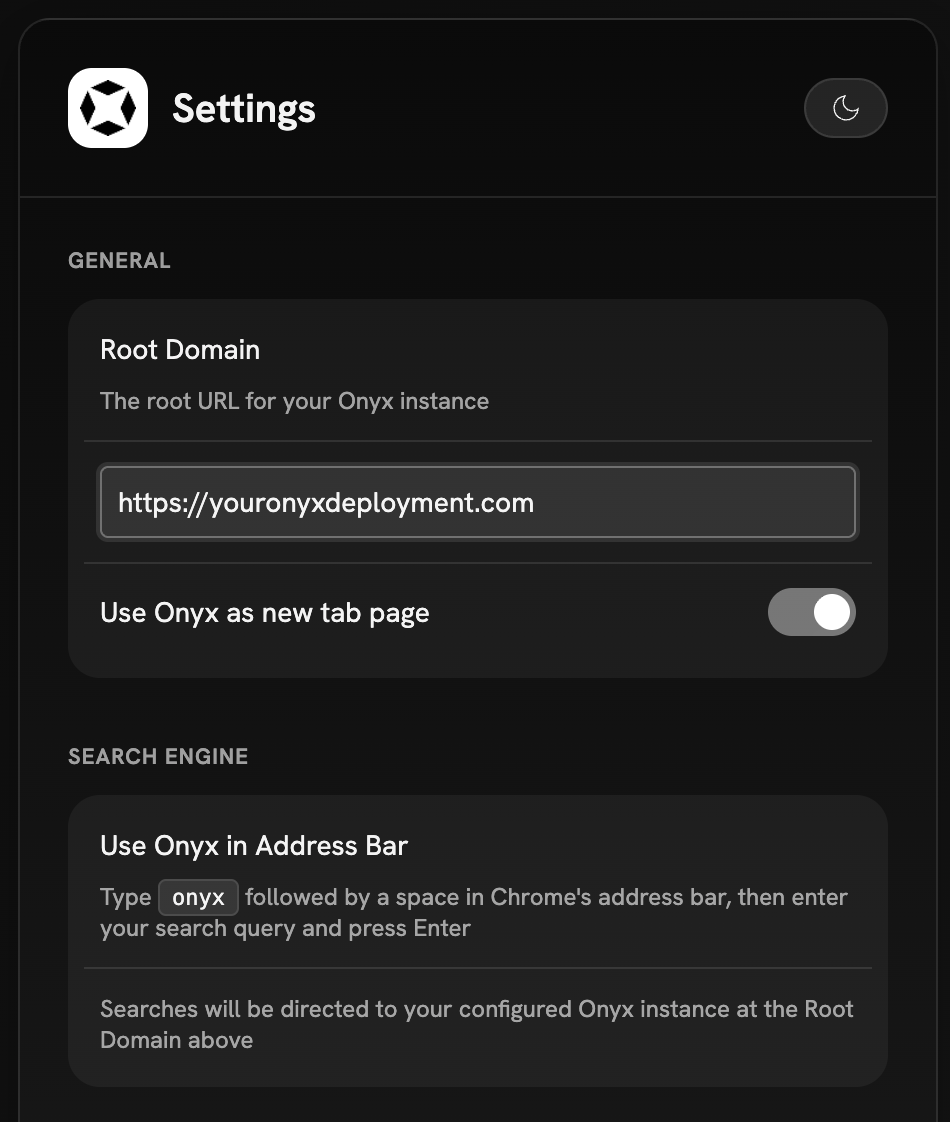 The extension will now connect to your self-hosted Quor instance and can be used from any page in Chrome.
## Enterprise Deployment
For organizations deploying the extension at scale, use Google Admin Console for centralized management.
- Log in to your Google Admin console
- Navigate to **Devices → Chrome → Apps and extensions**
- Obtain the Chrome extension ID from an Quor team member - Click the yellow
plus icon to add the extension - Enter the Chrome extension ID and click **Add**
Configure deployment options such as:
- Force installation for specific organizational units
- User access controls
- Update policies and version management
- Installation policies (allowed, forced, or blocked)
Remember to save your changes after configuring the extension settings.
### Self-Hosting the Extension
For private distribution without the Chrome Web Store:
Use Chrome's developer tools to create a CRX file
Place the CRX and update manifest on your server
Use Admin console or Group Policy to point to your hosted files
## Extension Management
### Update Policies
- **Enterprise deployments**: Chrome handles automatic updates every 5 hours
- **Version pinning**: Available for force-installed extensions, but avoid extended use due to
security updates
- **Self-hosted updates**: Increment version in manifest.json and replace hosted files
The extension will now connect to your self-hosted Quor instance and can be used from any page in Chrome.
## Enterprise Deployment
For organizations deploying the extension at scale, use Google Admin Console for centralized management.
- Log in to your Google Admin console
- Navigate to **Devices → Chrome → Apps and extensions**
- Obtain the Chrome extension ID from an Quor team member - Click the yellow
plus icon to add the extension - Enter the Chrome extension ID and click **Add**
Configure deployment options such as:
- Force installation for specific organizational units
- User access controls
- Update policies and version management
- Installation policies (allowed, forced, or blocked)
Remember to save your changes after configuring the extension settings.
### Self-Hosting the Extension
For private distribution without the Chrome Web Store:
Use Chrome's developer tools to create a CRX file
Place the CRX and update manifest on your server
Use Admin console or Group Policy to point to your hosted files
## Extension Management
### Update Policies
- **Enterprise deployments**: Chrome handles automatic updates every 5 hours
- **Version pinning**: Available for force-installed extensions, but avoid extended use due to
security updates
- **Self-hosted updates**: Increment version in manifest.json and replace hosted files